February 16, 2022

Coconut Cake to Cure a Sweet Tooth


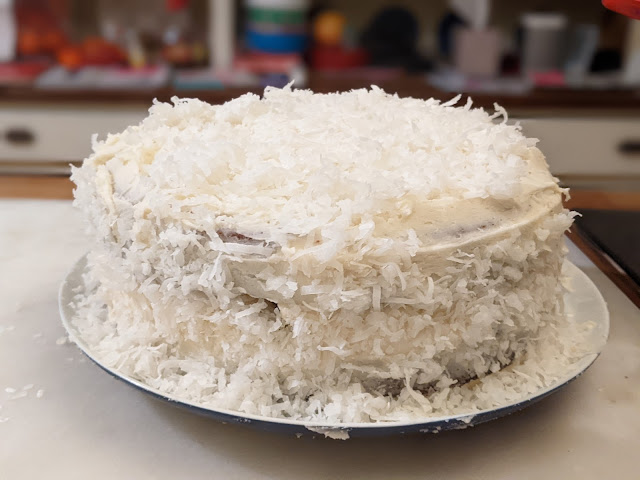
If you have people in your house who don't like desserts that are "too sweet," then you might not want to make this. We love it and make it a couple of times a year-- for a birthday, or Easter, or just when a hankering for something sweet is strong. The cake is moist and rich, with so much butter and and sugar in it (it is from a Barefoot Contessa cookbook) and five whole eggs. The frosting I prefer with it and included below is not the cream cheese frosting that the original recipe calls for, but just a favorite simple, sweet, vanilla one. Lots of coconut in the cake and on top provide texture, fun, and coconutty flavor. Enjoy!    


Coconut Cake
slightly adapted from Barefoot Contessa at Home

Cake:
3 sticks unsalted butter
2 C sugar
5 large eggs
1 1/2 t vanilla extract
1 1/2 t almond extract
3 C flour 
1 t baking powder 
1/2 t baking soda
1/2 t kosher salt
1 C milk
4 oz. sweetened shredded coconut 

Vanilla Coconut Frosting:
(Barefoot Contessa cake recipe comes with a cream cheese frosting. I use this simple vanilla frosting instead, from an unknown source-- a photocopy from an old cookbook.)

1/2 C butter
1lb. + 1 C confectioner's sugar (about 5 C)
2 t vanilla
1/8 t salt
4 - 5 T milk
6 oz. sweetened shredded coconut 

For Cake:
Preheat oven to 350. Grease two round 9-inch cake pans, line with parchment paper, then grease again and lightly dust with flour. 

In mixer, cream butter and sugar on medium-high speed for 3 to 5 minutes, until light yellow and fluffy. 

With mixer on medium, add eggs one at a time, scraping down bowl once during mixing. 

Add both extracts and mix well. 

In a separate bowl, stir together flour, baking powder, baking soda, and salt. With the mixer on low, alternately add the dry ingredients and the milk in three parts. Mix until just combined. 

Fold in coconut. 

Pour batter evenly into the two pans and smooth the tops. Bake for 30 - 45 minutes, till tops are brown and a cake tester comes out clean. 

Cool in pans for a bit, then turn out onto baking rack to finish cooling. 

For Frosting:
Cream butter, 1 cup confectioner's sugar, vanilla, and salt in large mixer bowl. 

Add remaining confectioner's sugar alternately with milk, beating to spreading consistency. 

To assemble, place one cake layer on a plate, top side down, and spread top with a little less than a third of the frosting. Place the second layer on top, top side down, and frost top of that with another third (or less) of frosting. Use remaining frosting to frost the sides. (This recipe never seems to completely hide every bit of cake, but the coconut helps, plus when you eat it there is plenty of sweet frosting to go around flavor-wise, so it seems like the right amount!) 

Sprinkle the top with coconut and press more on the sides. 

Serve at room temperature, but store in the fridge. 

December 19, 2021

Spaghetti Squash Casserole


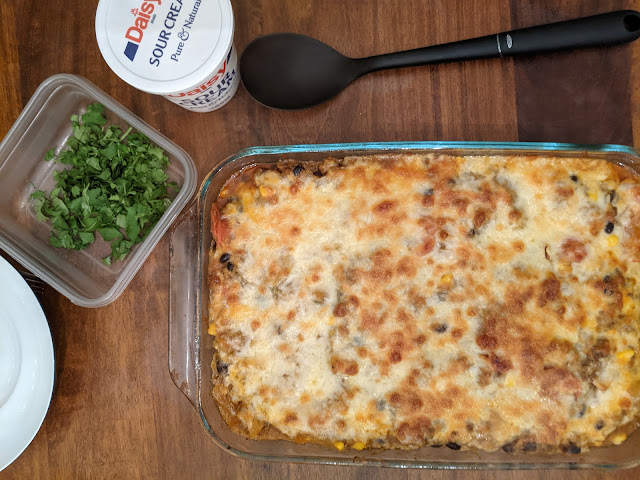
A friend shared this recipe with me and I'm so glad she did. It's been a regular in our fall and winter meal rotation ever since. It's such a good one for so many reasons. It's basically taco night in another form (minus the carbs and with spaghetti squash added) so the whole family loves it. It's a one-dish meal so there's no need to dream up any side dishes. Spaghetti squash is just plain fun-- the kids love to help fork the tender strings of it out after it's been cooked. I like spaghetti squash fine with just butter and salt and Parmesan, or with marinara sauce, but it's not really exciting in those ways; this dish, though, showcases a lot of it in a really flavorful way. If you bake the spaghetti squash ahead of time, this meal comes together so quickly and only needs to bake long enough to melt the cheese. Everyone can top with their version of the perfect toppings and it's a party in your mouth.


Notes:
1. It's great to bake the spaghetti squash ahead (even the day before) so it isn't hot when you have to scrape it out. Plus, if the squash is already cooked (and scraped!) this meal is a super quick on to put together. 
2. You could omit the beans (or omit the meat), and could change/add other vegetables as desired. This is a flexible recipe. 

Spaghetti Squash Casserole
adapted from blessherheartyall.com 

1 spaghetti squash
1 lb. ground beef or turkey
1 package taco seasoning (or 3 - 4 T homemade)
1 C grape tomatoes, halved 
1 C corn kernels
1 onion, chopped
1 can black beans, drained and rinsed 
salt
2 C shredded cheddar 

To Serve:
cilantro
sour cream
wedges of lime
hot sauce if desired 

Heat oven to 400. Halve spaghetti squash and scrape out seeds. Place face down on greased baking sheet or casserole dish. Prick all over with a fork or paring knife. Bake about 40 minutes or until it is tender when you poke it. Let it cool (this part is great to do ahead). 

When cool, use a fork and scrape out the inside of each squash half. Squash will come out in strings that look a lot like spaghetti. Scrape it out until you get all the way to the hard outer shell. Discard shells and set aside squash. 

Brown meat in a large skillet over medium heat until fully cooked. Add onion, taco seasoning, and 2/3 cup water and cook another couple of minutes until most of liquid has cooked off. 

Add tomatoes, corn, and black beans and cook another couple of minutes. Stir spaghetti squash into this mixture. Season with salt.

Transfer mixture to 9 x 13 casserole dish and smooth the top. Sprinkle with cheese. Bake at 350 for 15 minutes or until cheese has melted and browned slightly.  

Serve by topping individual servings with desired toppings and a sprinkle more salt at the table.

Peppermint Bark


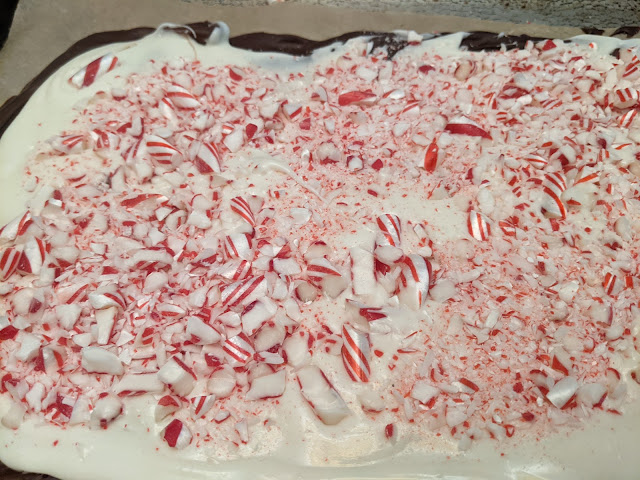
Peppermint bark is one of our more recent Christmas "cookie" traditions. It's so simple, yet so tasty and additive. Plus it's beautiful and stores well, so makes a great addition to any cookie plates/tins/boxes you may be giving as gifts this time of year. 


Peppermint Bark
from delish.com

12 oz. semisweet chocolate
12 oz. white chocolate
1/2 t peppermint extract
8 candy canes, crushed 

Line a baking sheet with parchment paper. 

Melt semi-sweet chocolate in a double boiler. Stir in extract. Pour into prepared baking sheet and spread into an even layer with small or offset spatula. Refrigerate until set, about 20 minutes. 

Wash double boiler to reuse. 

Melt white chocolate in a double boiler. Pour over set semi-sweet chocolate and them immediately sprinkle with crushed candy canes. (It's okay if the candy canes are unevenly crushed; my kids love finding chunks of candy cane loose in the tin and eating them.) Refrigerate until set, about 20 minutes. 

When cool and hard, lift up bark from parchment and break into shards. Store stacked in a tin at room temperature. 

March 25, 2021

We Made Cheese!


Note: Oh, my. This post for so long fell into the category of neglected drafts along with so many others. I haven't been as on top of this blog in recent years as I once was, and so I recently found it just sitting around, last edited years ago. Seems a waste to leave it there (especially since it includes cute pictures of my then-round-faced toddler, and memories with some friends whom we still don't see often enough). So here it is-- maybe it will inspire me to make some cheese again soon...  


Fresh mozzarella! All by ourselves in our very own home in about a half an hour.

We have some good friends who we don't see nearly enough. When we saw them one day back in 2013 and the topic of getting together to try making cheese was brought up for the two-dozenth time, they, despite the fact that they had at the time a 1-month-old baby, said, "how about tomorrow?" And so we made it happen.

I never once considered the idea of making cheese until I read Animal Vegetable Miracle. Barbara Kingsolver wrote about how she and her family took a cheesemaking 101 class with the "cheese queen," Ricki Carroll, in her home in Ashfield, Massachusetts and she wrote about how cheesemaking, particularly mozzarella making, was an accessible thing for anyone to attempt in their home. It was enough to get me to take the very same class in the fall of 2012. (At the time, I idealistically thought my children would only ever eat homemade bread and that I'd always have casseroles made up in the freezer and shelves of homemade jams and sauces to draw from; making my own mozzarella fit right into this image.) The class was a great learning experience and a really fun day-long adventure meeting a great variety of interesting people. In the class we learned to make mozzarella, as well as farmhouse cheddar, and ricotta. 

I also ordered a kit from Carroll's New England Cheesemaking Company, which included a little recipe book, a thermometer, cheesecloth (not needed for mozzarella), citric acid, rennet, and cheese salt. 

On our own at home, the mozzarella process was as manageable as both Barbara and Ricki said it was, and a lot of fun. We made two batches and already were improving our technique with the second round.

Once you have the rennet or rennet tablets and the citric acid, all you need is a gallon of milk. For mozzarella, it can be pasteurized but can not be ultra-pasteurized because the cheese queen said she had tried it and that it doesn't work.  

It was a really neat and rewarding process (I mean, we MADE! CHEESE!) and a great activity to do with friends. 

I am sad to say that we haven't made it since. But, there's not a time I slice through a ball of fresh local mozz (which, thankfully, we can procure pretty easily around here) and don't briefly realize and appreciate how it was made. As with anything, this makes it taste all the better. But now that the kids are older and no one is 1 month old anymore, we should do it again and more often. It is a little like magic watching it turn from milk to soft but solid cheese in the pot. It is an activity and a meal/snack all in one.


30-Minute Mozzarella

1 gallon milk (pasteurized, but not ultra-pasteurized)
1 1/4 C cool, chlorine-free water
1 1/2 t citric acid
1/4 rennet tablet or 1/4 t single strength liquid rennet 
1 t cheese salt

(Supplies needed: dairy thermometer, long knife (I used one meant for frosting cakes), colander, slotted spoon, large (1 gallon) stainless-steel pot)

Dissolve rennet tablet or liquid rennet in 1/4 C cool water and set aside. (Wrap remaining pieces of tablet in plastic wrap and store in freezer.)

Mix citric acid into 1 C cool water until dissolved. Pour into pot.

Pour entire gallon milk into pot and stir vigorously. 

Heat the milk to 90 degrees Fahrenheit while stirring. 

Remove pot from burner and slowly stir in rennet solution with an up and down motion for about 30 seconds. 

Cover the pot and leave it undisturbed for 5 minutes. (This is when the magic happens!)

Check the curd by pressing down gently near the sides of the pot with the back of your hand. It should look like custard, with clear separation between the curd and the whey. If curd is too soft or whey looks milky, let it set for a few more minutes. The longer you let it sit, the easier it is to drain off the whey. 

Cut the curd with a knife that reaches to the bottom of the pot. Cut in 1-inch cubes both ways, then at a 45-degree angle. (See photo above for my imperfect version of this.)

Place the pot back on the stove and heat to 105 degrees while slowly moving curds around with your spoon. Stir gently, pulling up with the ladle to cut any remaining big ones.      

Take off the burner and continue slowly stirring for 2 - 5 minutes. (More time will make a firmer cheese.)

Ladle curds into a colander (over a bowl) and drain off as much of the whey as you can without pressing the curds too much. 

Put curds in a microwaveable bowl and microwave for 1 minute. 

Remove and drain off the whey as you gently fold the curds into one piece (knead a bit to squeeze out, stretch, fold, stretch again). Add 1 teaspoon salt.

Microwave another 30 seconds. Drain again and stretch the curd. It must be 135 degrees (or uncomfortable to hold) to stretch properly. Knead from the outside in, in a ball. Stretch it by pulling until it is smooth and shiny. The more you work the cheese, the firmer it will be. 

Form cheese into a log or ball or braid it. 

When finished, to stop it from further cooking, submerge it in 50 degree water for a few minutes, then ice water for 15 minutes. This will cool it down and allow the cheese to hold its shape and silky texture and keep it from becoming grainy. 

Enjoy in any way you would enjoy fresh mozzarella! We had ours on bread layered with pesto and some sort of tomato topping. I don't remember what exactly but I do remember it was delicious and consumed immediately.

Banh Mi Chicken Sandwiches


In summers past, the kids and I would sometimes meet up with my husband in town at lunchtime on Thursdays to watch an outdoor family concert while we enjoyed a picnic. Sometimes I'd pack food, but more often we took the opportunity to patronize a new food truck that was right nearby selling Cambodian food. We liked their sandwich especially, with a choice of protein and pickled vegetables and cilantro on top. Later, that food truck became a restaurant, and we get delicious takeout from there now and then. 

One day I was looking for fun sandwich ideas as I was planning our dinners for the coming week, and I came across this Vietnamese banh mi sandwich. I'm a sucker for anything involving rice vinegar, soy sauce, lime, and cilantro, so I had to try it. It was so good (and so easy). It reminded us a lot of the yummy food truck/takeout sandwiches we'd enjoyed. We've had it several times since and most recently because my son remembered and requested it. It is the absolute best if you love quickly-pickled vegetables and a tiny bit of spice. But the nice thing is this sandwich is simply a base of deliciously marinated chicken that everyone likes, and the other stuff can just be brought to the table as optional toppings so everyone can finish their own sandwich the way they like. The last time we had this, we happened to have leftover pickled onions from a recent taco night and those were a fabulous addition. 

We generally take this meal (and most any sandwich night) as an excuse to eat potato chips on the side. (And if you're not a bread/sandwich person, I'm sure this same basic recipe for the chicken, vegetables, and toppings would be as amazing on a salad or on a bowl of rice.) 


Vietnamese Banh Mi Sandwiches 
slightly adapted from Little Spice Jar 
(serves 4)

for pickled vegetables:
1/2 C water
1/2 C rice vinegar
1/2 C sugar
2 t salt
cucumbers and carrots or other vegetables on hand, all thinly sliced into 1/4-in.-thick matchsticks* 
          *(original recipe called for 6 oz. daikon, 6 oz. carrots, and 2 Persian (small) cucumbers, but since 
          the first time we made this, I've skipped the daikon and used more carrot instead or added onion, 
          depending on what we had)

for chicken and marinade:
about 1 lb. chicken breast, sliced in strips
3 cloves garlic, minced
1/4 C soy sauce 
1 T sugar
1 T mayo
1/2 t lime zest 
2 t Sriracha (we use Cholula instead)

for sandwich assembly and toppings:
4 Vietnamese bread rolls or French baguettes (we buy "European Ciabatta Rolls" from Hannaford, which are the perfect size)
mayo
sliced jalapeno or more Cholula
chopped cilantro
 
For vegetables: 
Combine liquids, sugar, and salt until sugar/salt dissolve. Add vegetables. Allow to pickle while stirring occasionally for an hour, or up to 24 hours in the refrigerator.

For chicken: 
Combine marinade ingredients. Add chicken and allow to marinate for 20 minutes, or up to 24 hours in the refrigerator.

Cook in a skillet until cooked through. (I don't worry too much if the marinade can't sit for long, since the chicken cooks right with its tasty marinade.)

For sandwiches:
Slice baguettes in half lengthwise and toast. Spread with mayo. Top them evenly with chicken. Serve at the table with sides of pickled vegetables, chopped cilantro, and jalapeno slices or hot sauce (and pickled onions if you have them). We eat potato chips on the side.